About the Project
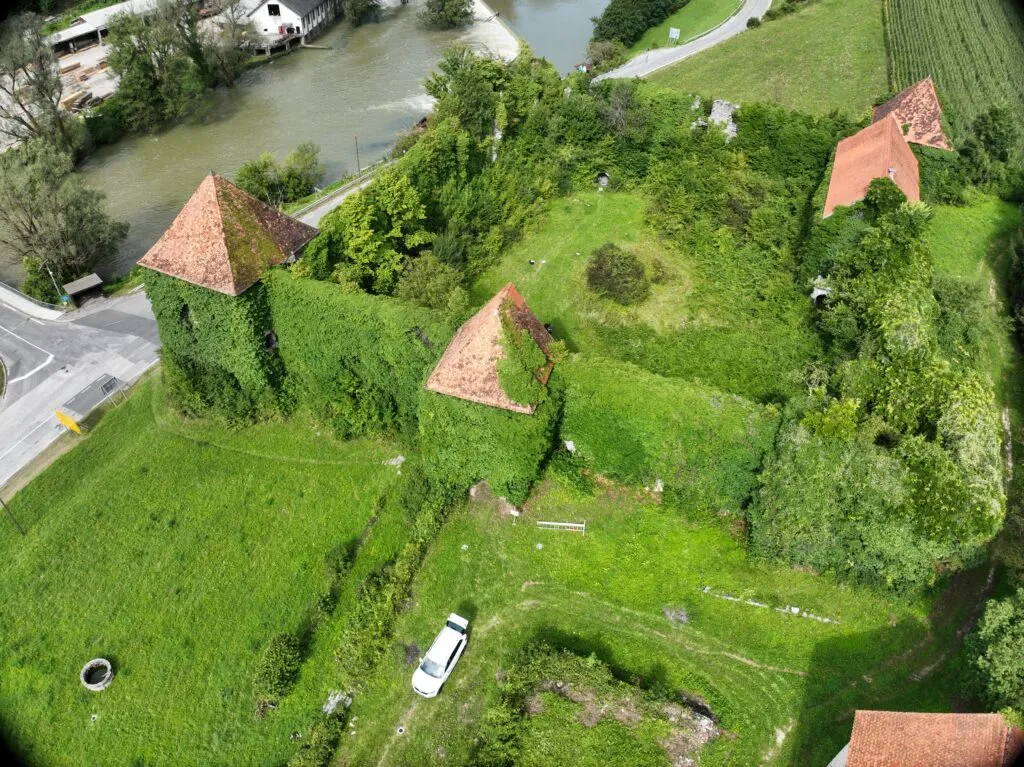
The local municipality in a small village in the Lower Carniola region of Slovenia reached out about an old castle which needed one of its towers renovated. The municipality had contacted a traditional surveying company to create a map of the area before, but decided they needed more detail on the specific tower to better plan the restoration.
Due to the very specific limitations and challenges present on-site, they hoped 3Dsurvey might offer a better solution, with more accurate results.
The Challenges
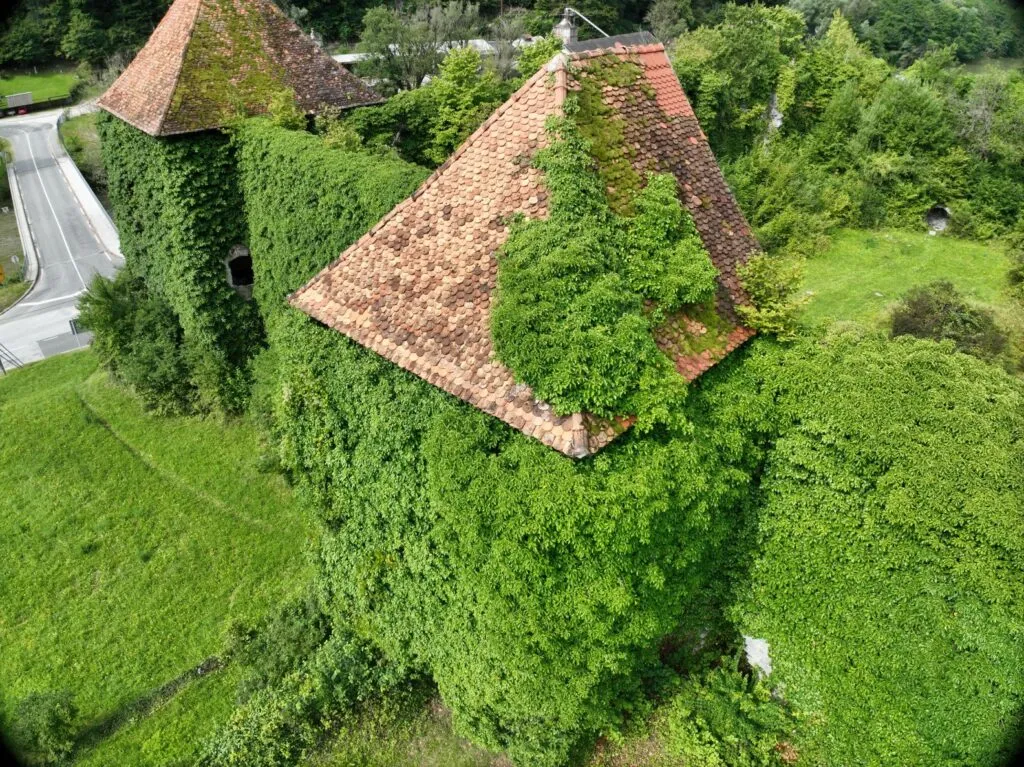
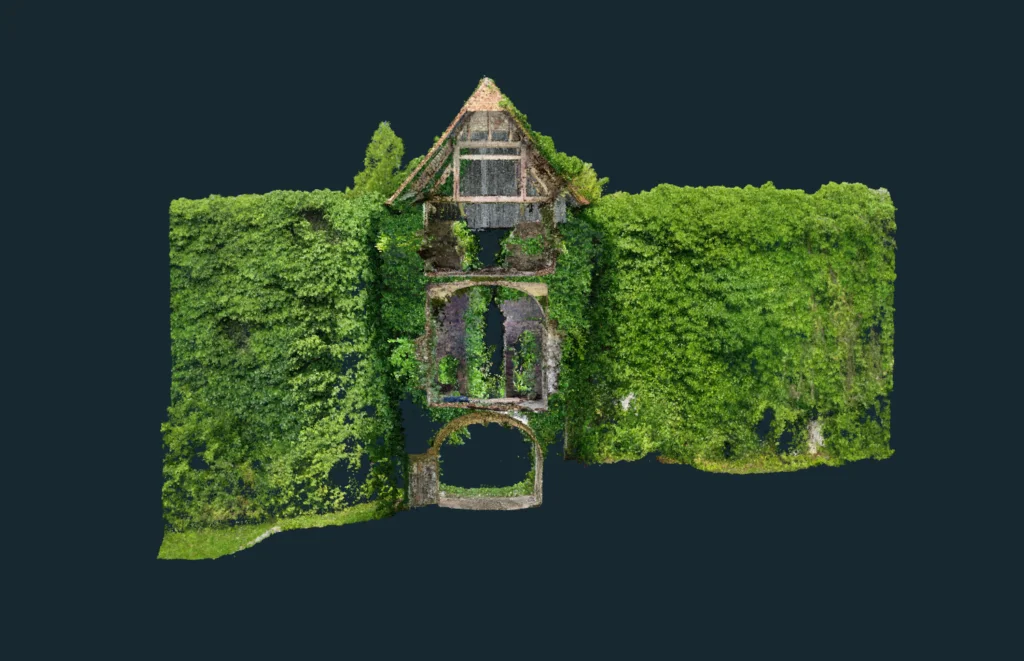
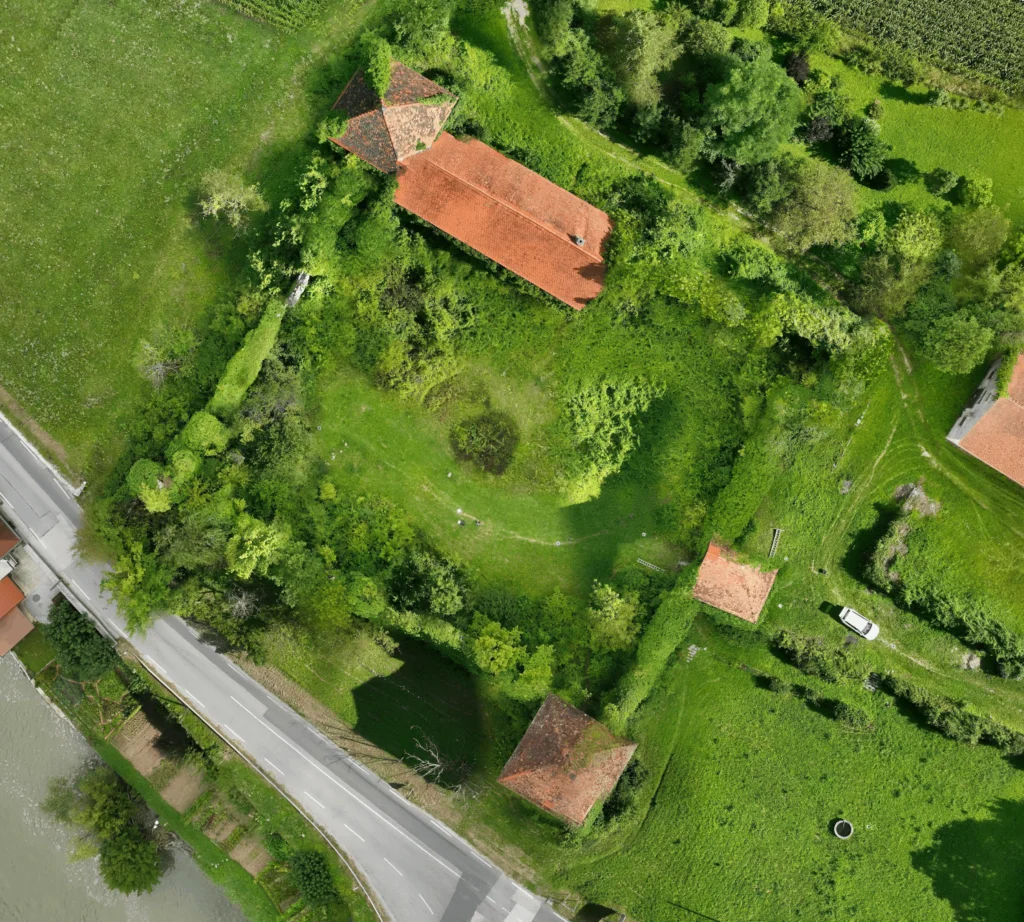
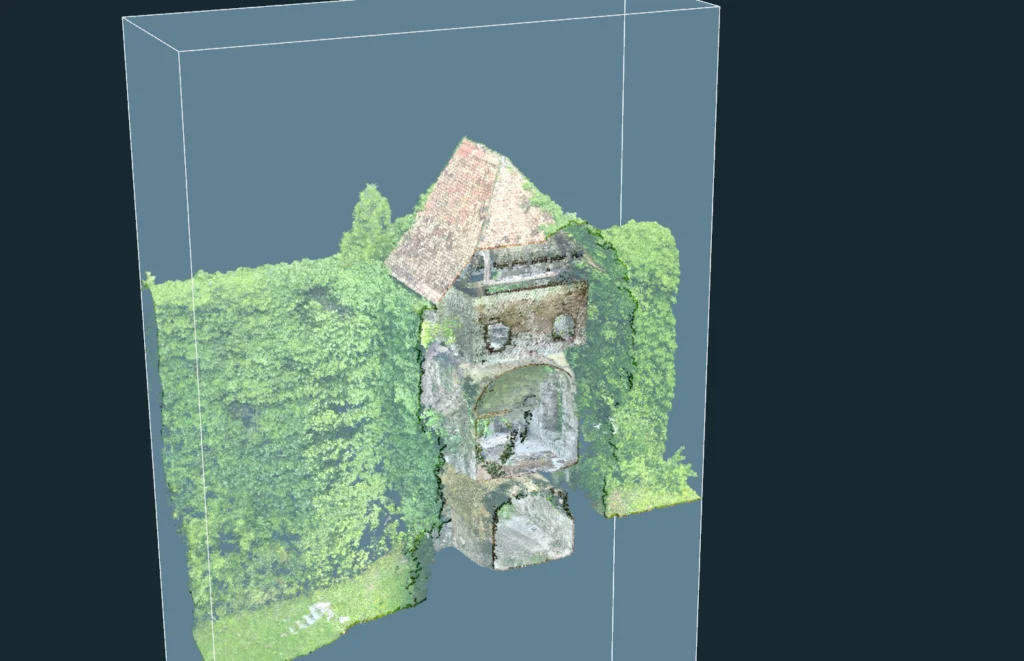
The castle is old and dilapidated, and the towers are structurally unstable. The entire castle and towers are almost completely covered in thick ivy. Each of these aspects make measuring very difficult to achieve. Traditional surveying methods will struggle to deal with the dense vegetation and potential danger of the unstable building possibly collapsing if scaffolding is constructed around the tower.
Traditional methods would need to cut away the ivy to put points (targets) directly on the walls, and considering uneven castle walls, a thick net of points would be needed to achieve sufficient accuracy. This approach would also get more difficult to do higher up on the tower.
Another approach would be to put targets on the vegetation and then measure the distance to the wall, but this would be very time consuming and also very likely inaccurate.
With all this in mind, the drone survey presents a bigger advantage and better option in terms of safety and capturing the height and detail of the tower.
However, dense vegetation and trees can also be a challenge for photogrammetry. Foliage can obstruct the view of the ground or objects beneath it.
Some Limitations of Photogrammetry
Photogrammetry relies on having clear and unobstructed images of the terrain or objects to create accurate 3D models. When trees and vegetation block the view, it can result in incomplete or inaccurate reconstructions. Photogrammetry also depends on identifying common features or points in multiple photographs to triangulate their positions in 3D space. Due to the constant swaying of tree branches, leaves and vines, even in the slightest breeze, vegetation can create a complex and cluttered visual environment, making it challenging to find and match these key features across images.
Lastly, trees and vegetation can cast shadows that change with the time of day and weather conditions. Especially when you are doing long flights, these changing shadows can create inconsistencies in the images, making it difficult to precisely determine their positions, which leads to inaccuracy. These are important factors to consider when in the field, so that when it comes to inputting your data into 3Dsurvey software, you can recreate the environment with as little inconsistencies as possible.
As another addition, you could have chosen to include a terrestrial laser scanner or LiDAR technology to tackle the dense ivy around the tower. Because LiDAR uses laser pulses to measure distances, it could have helped penetrate the vegetation to some extent. However, the issue of the inaccessibility of the higher levels remains, as well as the fact that LiDAR systems are fairly costly.
The Limitations of the Project
The municipality had strict limitations in terms of budget, time and inaccessibility of the upper parts of the tower. They also refused to remove any of the ivy as they believed this helped the structure remain somewhat stable.
In a previous attempt they used a truck lift. This was expensive, and time consuming, and thus the municipality was more pressed for an easier solution. We concluded that the bare walls were practically impossible to capture and measure, and thus decided on a combined approach.
The Approach
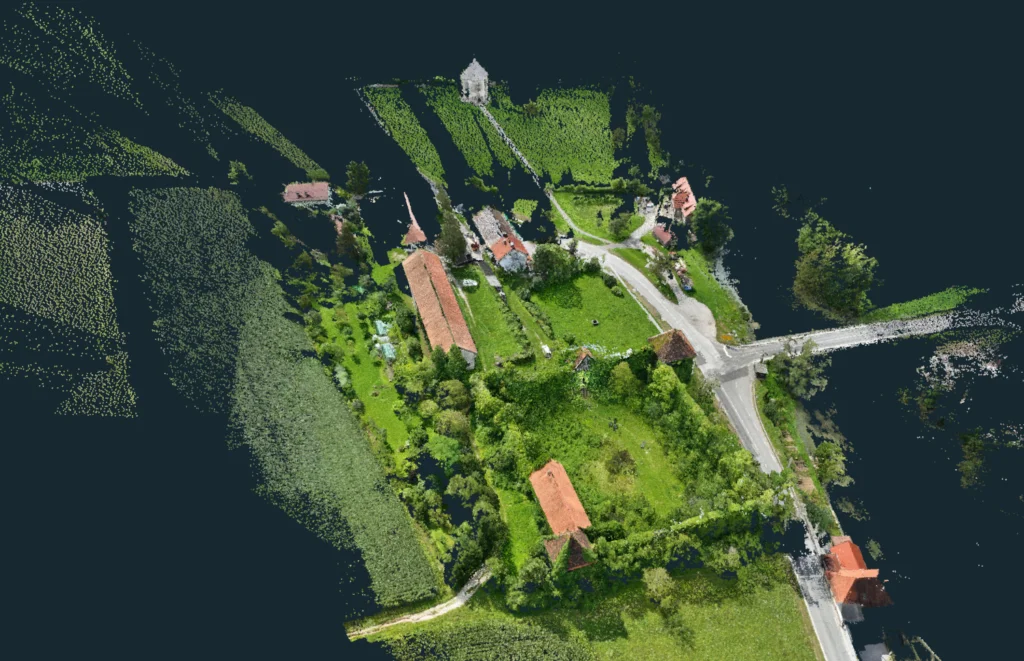
Our team chose to use drone imagery, traditional surveying methods and videogrammetry to create accurate 3D models of the tower. We used a DJI Mavic 3 Enterprise drone. The drone images were taken at various heights and angles to accommodate for all the vegetation and complex building forms. Since we wanted to create a high fidelity representation of reality, it was very important to take images at varying angles.
Remember: if you want to view it from a certain angle, you have to photograph it from that angle.
If you fly too low over the trees, you will most likely get holes in your 3D model of where the trees should be. This is why it’s recommended to fly at altitudes of 60 meters or higher. This not only ensures better coverage of forested areas but also ensures the overall coverage of the environment below, leading to best outcomes when creating a traditional orthophoto. Flying lower and closer to the object, however, will result in more detail and better texture in higher resolution. Therefore, we recommend flying at both heights for best results.
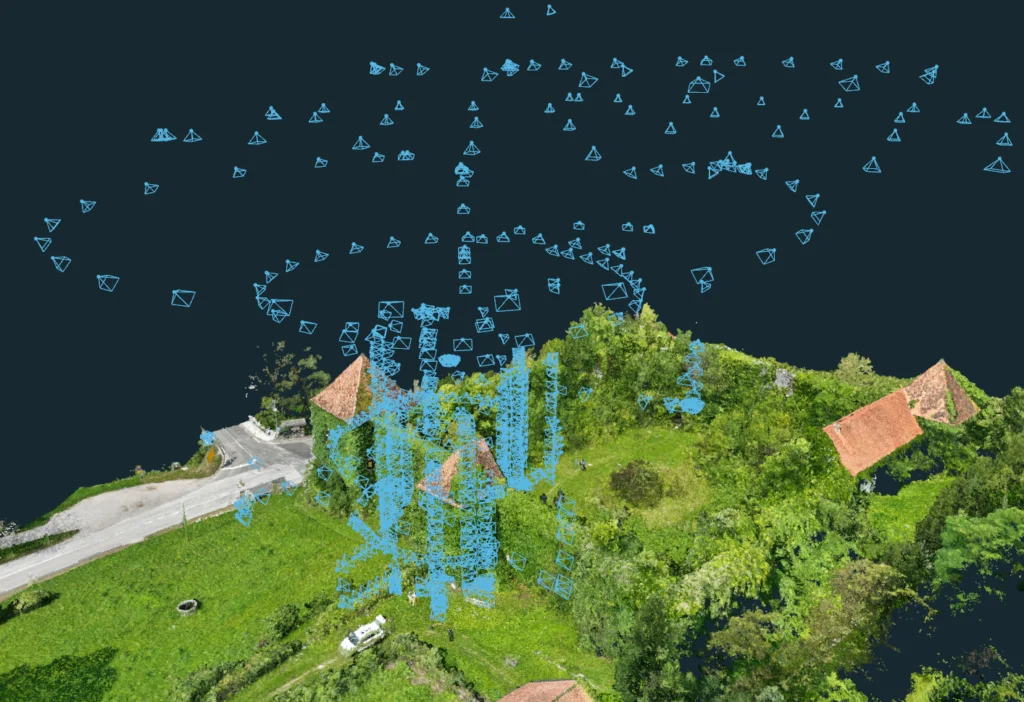
A total of 1,137 images were used. The more images you use, the more detail you will get. While our drone does have an RTK (Real-Time Kinematics) module, we also used GCPs (Ground Control Points) to make sure our model is precisely geolocated.
For our flight planning, we first used a simple mapping mission to have a basic coverage of the area, after that we continued to fly manually to get as close as possible. In the last phase we even switched to ATTI mode (short for Attitude mode), a specific DJI flight mode where the GNSS and VPS (Vision Position Systems) are disabled, to get really close, perhaps even too close.
Fieldwork
We spent about 3 hours on-site.
The drone flying took approximately 2 hours. The automatic programs took a couple of minutes to complete, while some of the manual flights took a bit longer, partly due to adapting to the unfavorable weather conditions (strong sunlight and wind) and partly due to flying in ATTI mode. We made sure to get many images of the outer and inner walls of the tower at various angles. This, however, is where we encountered some technical difficulties.
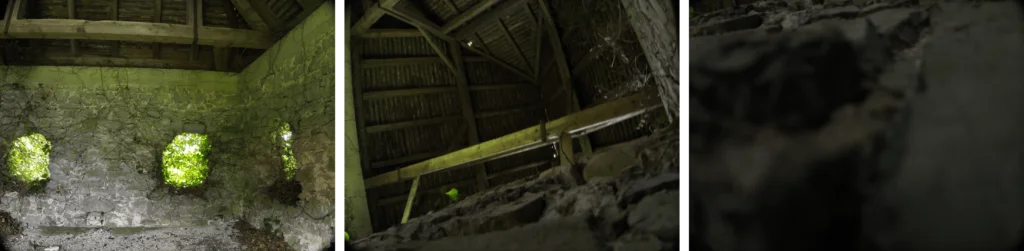
While flying the drone inside the upper part of the tower, we misjudged the situation and our drone’s propeller caught an ivy vine which caused it to crash in the uppermost floor of the castle tower. Luckily we had a ladder on-site and were able to climb up to retrieve it. As a benefit to this misfortune of crashing the drone, however, while inside the tower, we decided to use the smartphone to record video of the inner walls.
Videogrammetry is a great solution for aiding the 3D model construction, and is useful in contexts such as these when only a small area needs to be documented. The structure was stable enough to allow walking inside, and the videogrammetry and camera photos significantly improved the overall coverage of the 3D model. It is important to remember that 3Dsurvey supports all types of data input.
Recommendations when flying in ATTI mode
Some guidelines to avoid the drone crash when flying in ATTI mode:
- Adjust the sensitivity settings on your remote controller to match your skill level. Lower rates provide smoother control, while higher rates offer faster response but can be harder to manage.
- Lower maximum horizontal speed. The lower the speed the more time you have to react.
- Minimize the air risk: wait for the wind to weaken, etc.
- Ensure to maintain a visual line of sight (VLOS) at all times. If needed, use a spotter to take over the situational awareness and provide guidance if needed.
- Lastly, stay calm at all times: Stay calm, stay focused, and avoid making sudden, panic-induced movements on the controls.
3Dsurvey Workflow & Output
Data processing took roughly 4 hours to complete. This included minor cleaning and editing. We followed the usual workflow of importing the data, aligning the photos (bundle adjustment), orientating the model with GCP data, and then generating the point cloud.
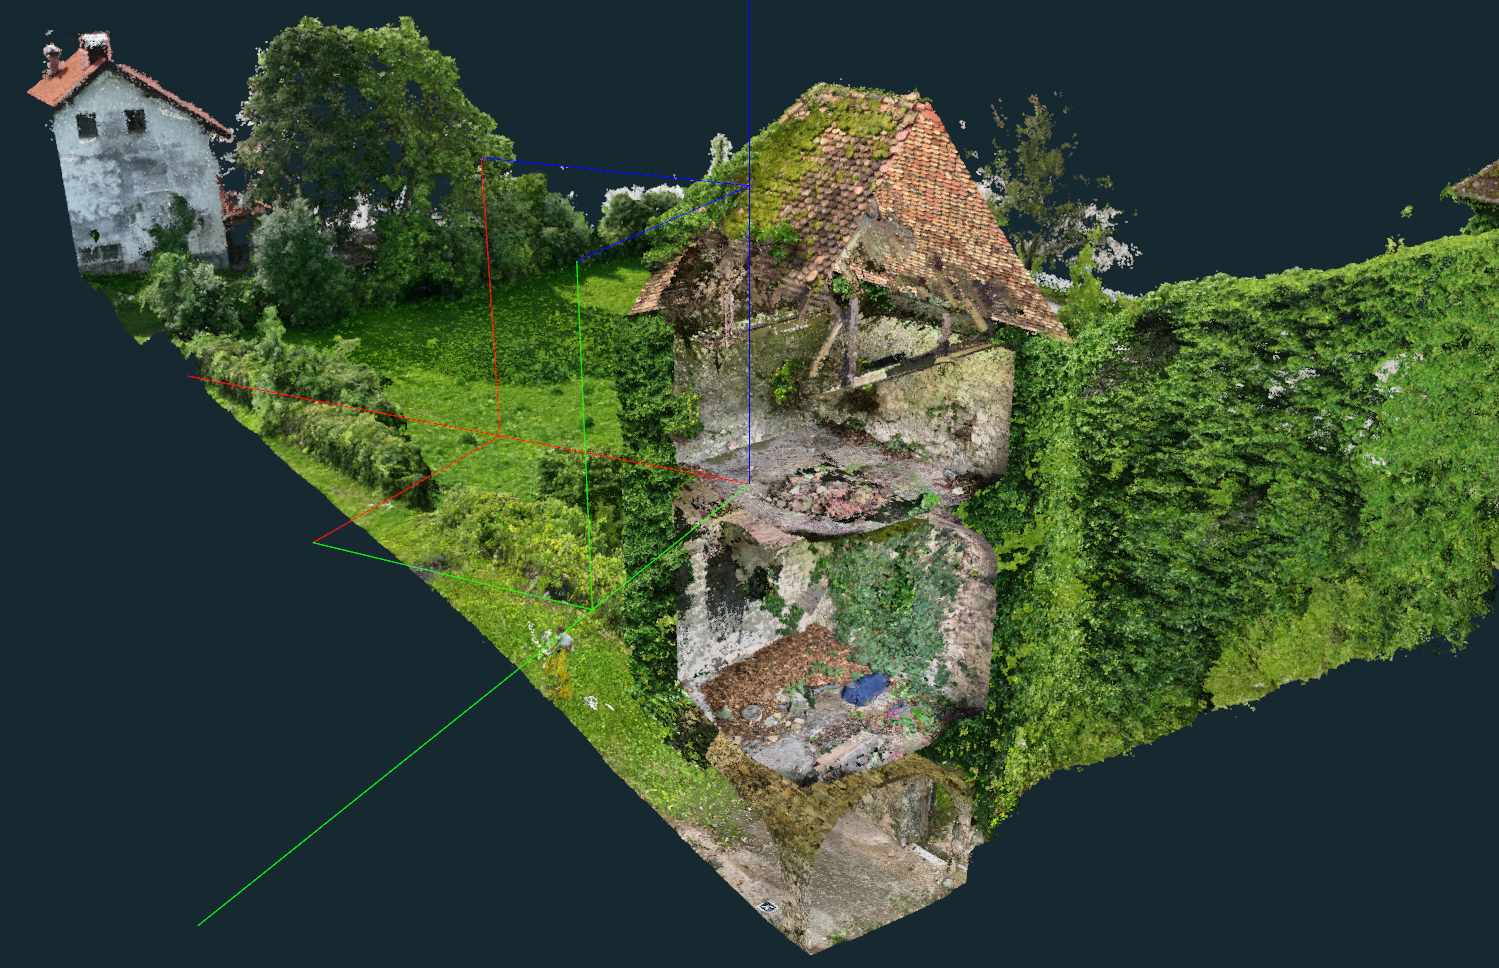
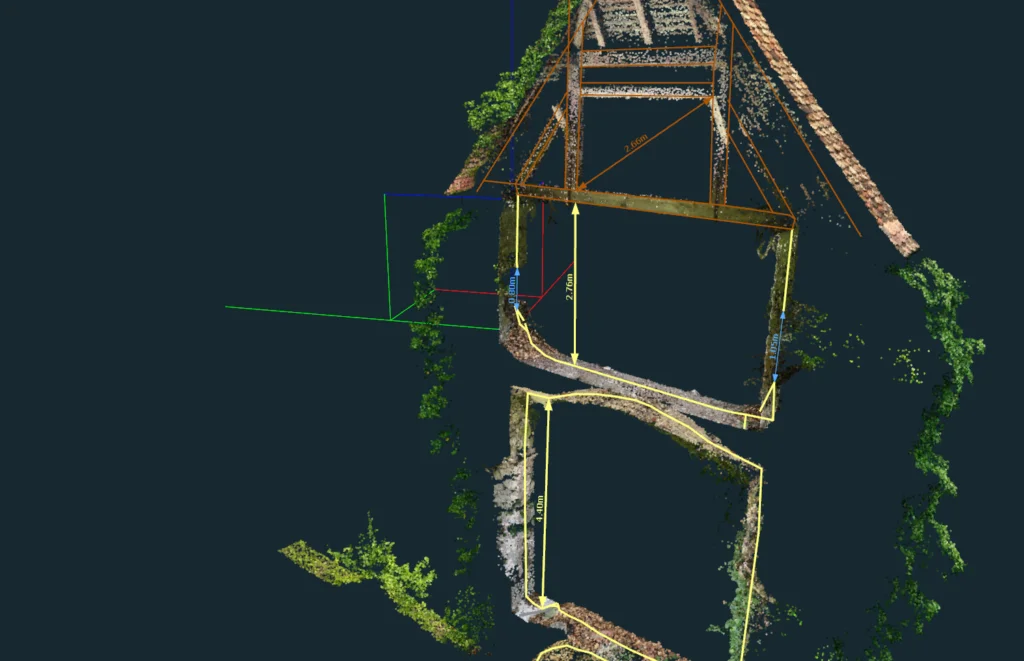
After the dense reconstruction was completed, we created the Full 3D Mesh. We then went on to generate our Orthophoto and CAD drawings. To get the cross sections of the tower we used the bounding box tool (which slices the model) and in that view commenced drawing lines with 3Dsurvey’s integrated CAD module. We also took time to import the classic survey measurements to double-check our results.
We supplied the municipality with aerial images, orthophoto, longitudinal & transverse cross sections. In addition we added a video of the finished 3D model, serving as a straightforward visual presentation.
We also shared the Point Cloud and 3D Mesh via 3Dsurvey Cloud platform. Find it here. It makes interacting with the 3D model easy and accessible to anyone, even if they are not 3Dsurvey users. Not only can our end-users view and rotate our/their models, they can also make quick measurements and add annotations, to communicate with co-operants. More demanding users will also find tools like map view and timeline useful for keeping track of their projects.
Conclusion
Despite being a challenging project with lots of limitations, and complications experienced on-site, 3Dsurvey software still offered the best, most cost and time effective solution. With a combination of drone imagery, classical surveying methods, data input from mobile phone photos and video, we were able to successfully recreate the castle tower in a 3D model with centimeter level accuracy.
The ability to input data from various sources in a single project is a significant advantage of 3Dsurvey that made a project like this possible. Therefore, despite our drone crashing in the middle of data collection, we had other options available to us to complete the project without a second trip to the location needed.
Understanding the limitations of photogrammetry also helps you on-site with your data collection. It ensures that you take enough images, from various angles and heights, all at a time of day when the light is optimal. This helps prevent you from having inaccurate results, holes in your 3D model, and needing to do a second trip to gather more data.
Written by: Amy Nicol & Matija Zupan