Key takeaways
The Select by Color tool in 3Dsurvey lets users pick and remove point cloud data based on color, using an eyedropper + adjustable tolerance slider.
It speeds up cleanup by targeting unwanted background noise (like sky blue or grass green) that often “sticks” to object edges.
With a bounding box, you can restrict color selection to specific areas so you don’t accidentally delete important parts.
The feature saves significant time: tasks that once required manual polygon selection can now be done in just a few clicks.
It supports advanced color-based classification, letting users separate point cloud classes (e.g. roofs, vegetation, asphalt) by color.
4 Ways to use Select by color feature and get ahead of competition
We developed a new feature in the 2.18 version update, which we believe can be applied in
many use cases to help you improve your accuracy when working with point clouds, creating meshes and true orthophotos. We’ve grouped these use cases into two categories: Cleaning
point cloud and Advanced semi-automatic classification.
See this feature in action in our tutorial video:
Category 1: Cleaning Point Cloud
The Select by Color tool is a great tool to use to clean your point cloud of unwanted colors; especially around the edges of objects where you often find the colors that were present in the background of the raw images (ie. blue/white of the sky or green of the grass).
One of the challenges with photogrammetry software is that residual colors often attach to the outlines of objects, such as buildings, roofs, trees, cranes, towers, etc. When wanting to clean your point cloud, the approach would always be to use the bounding box and polygon selection tool to select the unwanted colors and delete them section by section. This method works fine when removing large areas which can easily be selected.
The problem comes in when these points are so close to your object that you’d need to zoom in and manually select and delete individual points and repeat this process countless times. This is where the Select by Color tool comes in to save the day – it can literally save you a day’s work!
Use Cases and Applications
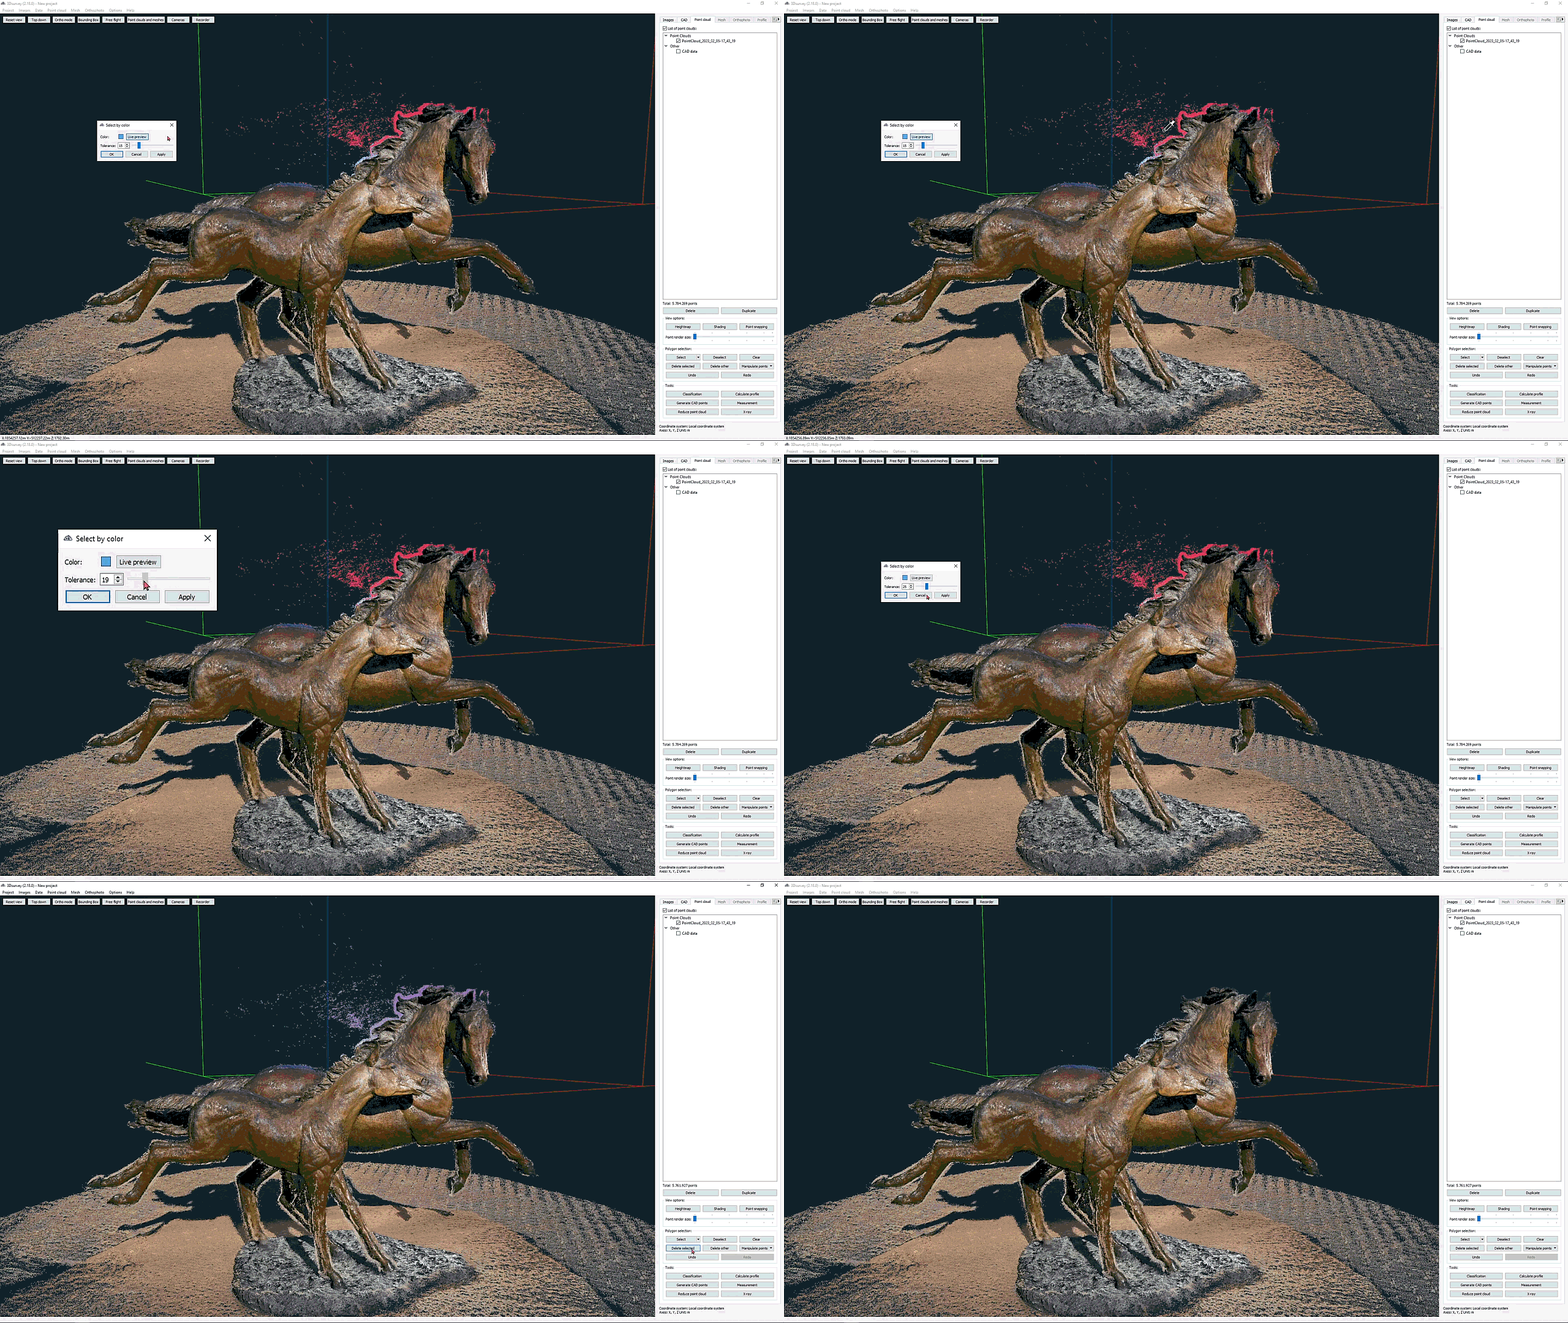
Quick and simple clean-up – Statue of a Horse
For this project, the aim was to create a true-to-form 3D model of a horse statue for cultural preservation and heritage. The 3D model would be used to digitally archive the cultural object, and take accurate measurements which would help restoration in the future.
Another specificity of this case is that it was done using videogrammetry.
Taking out your phone and quickly scanning reality can be really handy. However, when you’re using your smartphone camera from this vantage point, catching some of the colors from the sky on the edges of your object in the processing software can’t be avoided. If there were some trees in the background you’d probably get some green colors too. Getting that out of your 3D model is not an easy task, especially if it’s an irregular shape.
Now you can use the eyedropper tool to select the color, and use the tolerance slider to adjust the color range. This is a quick and easy way to select colors of the same hue across your point cloud and delete all of them with one click. The benefit is that you can remove these pesky colors from your point cloud so that you have a more realistic and true-to-form mesh.
With this nicely cleaned up point cloud, you will produce better 3D models, making measurements with the integrated CAD module more precise since your edges are sharper and true to form.
Multiple steps, advanced clean-up – Traditional Hayrack
Another cultural heritage case. Here we needed to get the most true-to-form 3D model of this traditional Slovenian hayrack, known as a ‘kozolec’, or ‘toplar’ when it’s a double structure.
These freestanding vertical drying racks are chiefly found in Slovenia and often regarded by Slovenes as a distinctive form of vernacular architecture that marks Slovene identity. Since these traditional hayracks are slowly vanishing from the Slovene agricultural scene, getting a unwanted colorsdetailed digital twin is of highest importance.
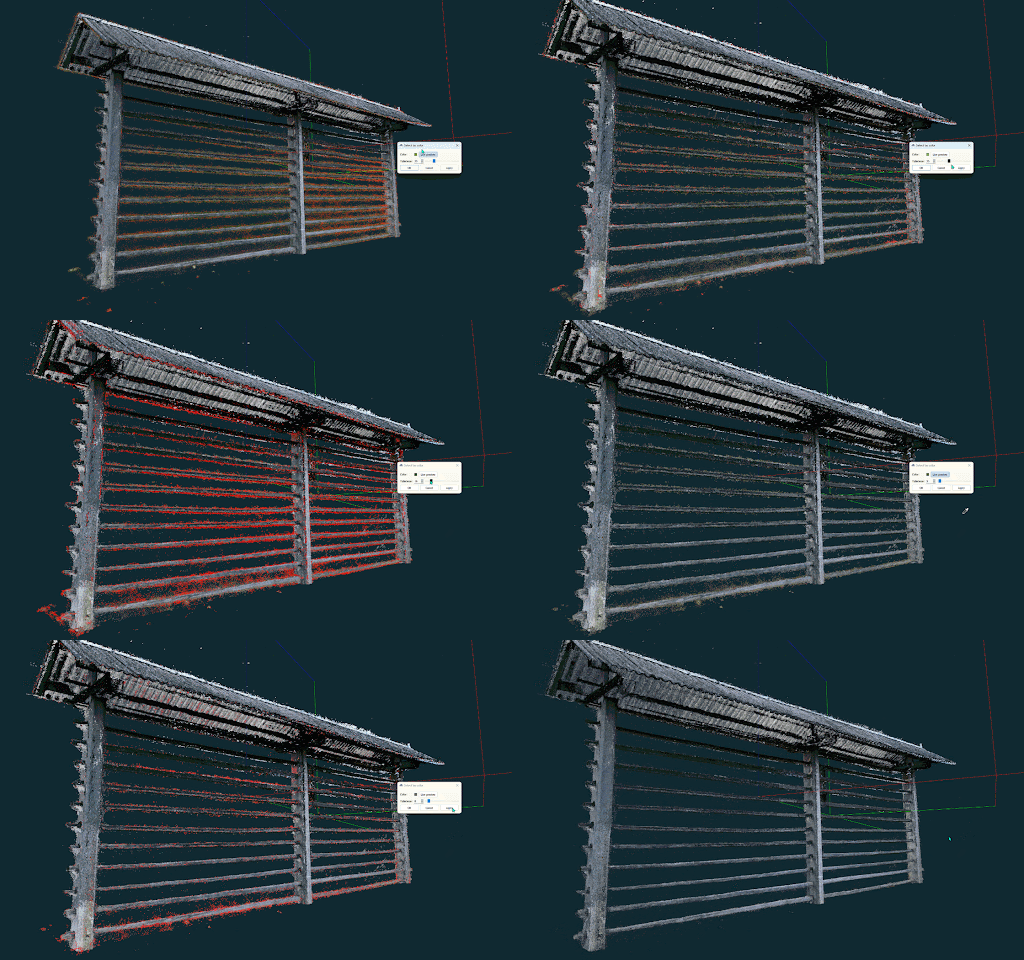
Sometimes the models you get straight out of processing may not look exactly the way you would want them to. With this project, the horizontal bars of the hayrack picked up a lot of unwanted colors from grass and trees in the background.
Tackling the cleanup of such point clouds is a tedious and unwelcoming task. Or, at least, it used to be.
Before Select by Color feature
Before you would have to carefully select the points around the bars (perhaps you can help yourself with the bounding box), but still you would need to adjust it numerous times, rotate the model and carefully select just the points you want to delete.
In a project like this, this would take hours to complete; not to mention the possibility of making a mistake and deleting something you did not intend to delete.
With Select by Color feature
Now you can save hours of your time and your sanity! And perhaps, most importantly, the chance for making mistakes is greatly reduced. Even though this case is a bit more complicated, you no longer need 50 to 100 steps – 3 or 4 steps will do.
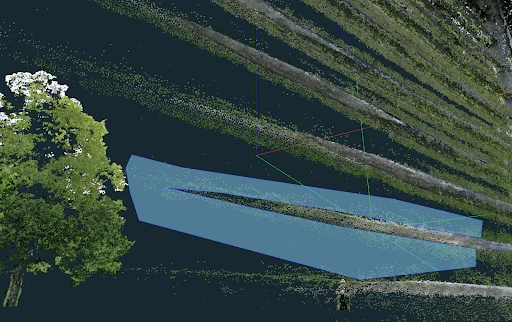
What makes this particular project tricky however, is the fact that here we actually want the grass beneath the hayrack to remain in the model. So if we would simply select the green grass shade and remove all points, we would lose the ground too.
Not to worry, as we paid attention to scenarios just like this! This is why we designed the feature to work within the bounds of the bounding box tool. If you don’t want something selected, simply leave it outside the bounding box.
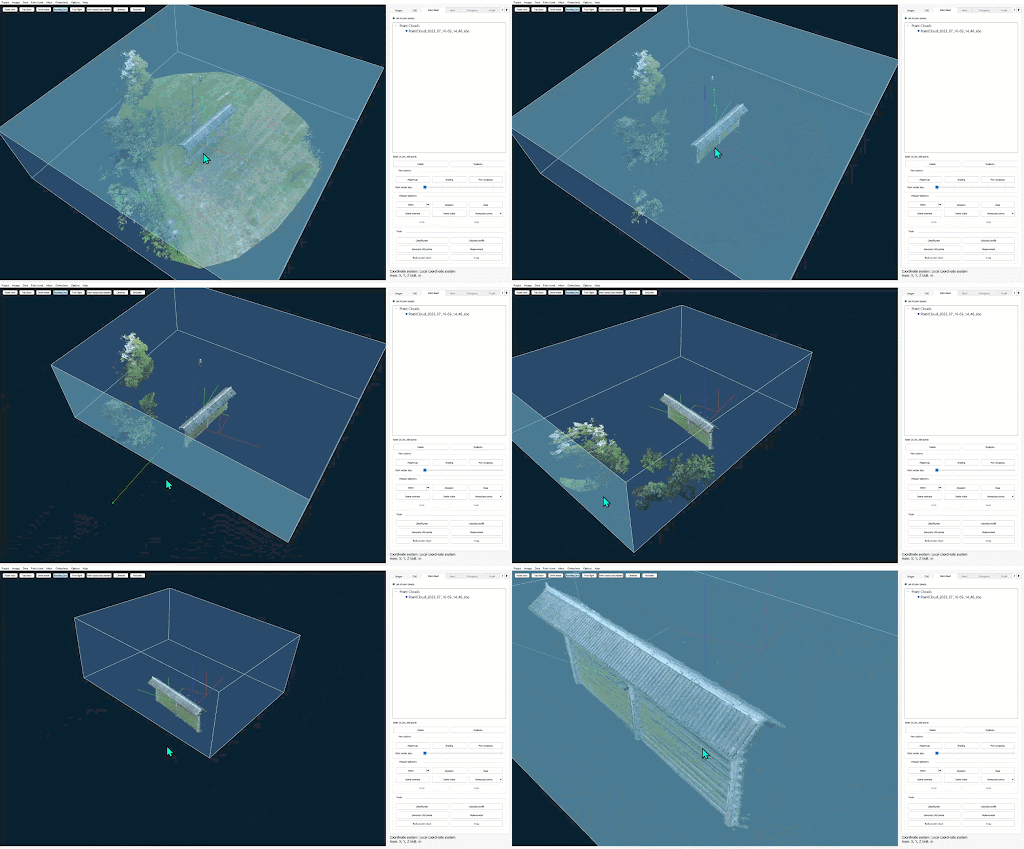
The second important aspect of this point cloud is the multiple shades of green.
Photogrammetry takes place in natural environments, hence the color shades come in a wide spectrum of hues and intensities. This means it’s sometimes hard to get the exact area with a single click. In such cases, the ‘Apply’ button is your friend, and helps you to add more colors to your initial selection.
Using the ‘Apply’ button
Step 1: Select the first green color shade.
Step 2: Carefully adjust the tolerance slider, and make sure you don’t select too much.
Step 3: Click Apply, and your selection will get updated and you can continue adding different shades of green to your selection.
You can repeat this step as many times you like.
Step 4: Once you’re happy with your selection, simply click ‘OK’.
Category 2: Advanced Classification
The Select by Color tool is also a great tool to use for advanced classification.
At the moment, 3Dsurvey software semi-automatically classifies the ground surface. In some instances, users might like to further subdivide their point cloud to better analyze specific classes. You could group points into categories such as Asphalt, Vegetation, Roof Tops etc.
Now you can simply select the color (ie. orange of the roof tops, blue of the solar panels, gray of the asphalt, or green of the grass) and assign them a new class. The reason you would want to do this is to filter and define your 3D model better.
The great thing about the tool is that you get a live preview of the selected points for immediate visualization, so you know whether you should adjust the tolerance slider or not.
Use Cases and Applications
Isolate the object of interest – Solar Panels
With this project, the aim was to vectorize and accurately measure the solar panels on these two side-by-side buildings.
In the image below you can clearly see the blue solar panels on the roof. The best way to do that, we thought, was to add the solar panels to a class of their own, and filter the model by this newly created class.
We selected the blue color of the solar panel, adjusted the tolerance slider to make sure all of the panels were selected, then right-clicked the point cloud they belonged to and chose the “Set class to selected points” command.
A new window opened up allowing us to name the new class. Then we filtered our model, and only showed the selected layer.
Vectorization becomes significantly more straightforward when you’re not distracted by the rest of the model. Single classes can also be exported as a separate point cloud. This means you can share just the classes you need.

Classify multiple layers – Traffic Roundabout
With this project, a landscape architect needed to do some work on a traffic roundabout. With the Select by Color tool, it is much easier to classify each layer, and separate the model according to the needed layer.
As you can see in the images below, the colors can easily be grouped into categories such as Grass Isles, Asphalt, Road Markings, Cycling Lane, Statue etc.
Once classified, you can easily toggle between the layers, or select which layers are most convenient to work on for each step of your project. You could take a snapshot of each layer if needed, or as with the solar panel example, export the individual layers.
Having the ability to do advanced classification gives you more control over your project, and will help with vectorizing or taking measurements.

The color green can include a wide range of different shades. Remember: you can perform your selection in multiple steps.
For example: select a bright yellowish shade, adjust the tolerance, click apply, continue on with a deep green shade and so on.

Possible advanced uses
Since this feature is really new, we don’t yet know all the possible use-cases for it. We believe that with this feature we could do some of the tasks that would normally require a multispectral camera.
If you are inspecting for the visual presence of moisture, for example, which would result in different color shades, you could rely on “Select by color”.
Another scenario would be to search for objects of a specific color in a large scanned area. Combined with the integrated CAD module, you could get their coordinates and distances almost instantly.
In the field of surface mining, “Select by color” could serve as the fastest way to select different materials or fresh cuts, for example.
Analyzing areas affected by floods would prove easier, since the flooded area could be selected and classified with just a few clicks.
Conclusion
Whether you are working on small projects (like documenting statues), or big projects (like monitoring a construction site), the Select by Color tool is here to help enhance your models and how you use your data.
Move more easily through your workflow, and focus on the parts of the project that are most important. Edit your data to work with the classes and layers you need, and with only the points you need.


