Summary
How to make a 3D model in 5 easy steps, you wonder?
Collect quality data — drone, SLAM, LiDAR, or phone video.
Align & generate point cloud — process images into 3D points.
Clean & trim — remove noise, crop, merge sources.
Build mesh & texture — adjust detail, add realism if needed.
Export & deliver — measure, create orthophotos, share, or integrate into GIS/BIM.
Read the full blog for detailed instructions, pro tips, and further explanation.
Introduction
Creating a 3D model isn’t just technical, it’s practical. Surveyors, engineers, and construction teams need accurate site data they can measure, check, and use. Fast. That’s where 3Dsurvey fits in.
Let’s be clear: this isn’t about 3D animation or design renders. We’re talking about accurate, measurable 3D reconstructions of real sites, built from drone photos, video, or scan data.
Why do we need them? They help:
- Track every inch of progress on your job site with undeniable clarity.
- Calculate excavation and stockpile volumes down to the last cubic meter, saving you time and money.
- Safely inspect those tricky, hard-to-reach spots like towering walls or intricate façades.
- Build with absolute confidence on terrain that’s a true reflection of reality, not just a flat drawing.
- Finally show stakeholders exactly what’s happening on site, even if they’ve never looked at a blueprint in their life!
It’s used for topographic planning, excavation tracking, structural inspections, stockpile analysis, and more, on real-world projects where fast, reliable results matter. You’ll find actual examples on the 3Dsurvey website.
A 3D model is only as good as the point cloud it’s built on. If you don’t know what that means, read our blog on What is a point cloud first.
Now let’s get into the steps.
1. How to make a 3D model? Start with the data you’ve got
Start a new project in 3Dsurvey. Load your photos, scans, or video frames and define the coordinate system.
The tool works with drone imagery, SLAM scans, LiDAR, and even phone video, so use whatever fits the job. Small site? Use your phone + RTK. Large area? Use a drone. Bring control points if you have them. Use RTK if you don’t.
But don’t confuse “data” with “good data.” Bad overlap? Blur? Weak GPS? Poor light? You’ll pay for it later. RTK not locked? Use GCPs.
Tip: Don’t skip control just because the drone says it’s fine. Rather take a moment and check out the The Fastest Way to Create Professional 3D Models webinar.
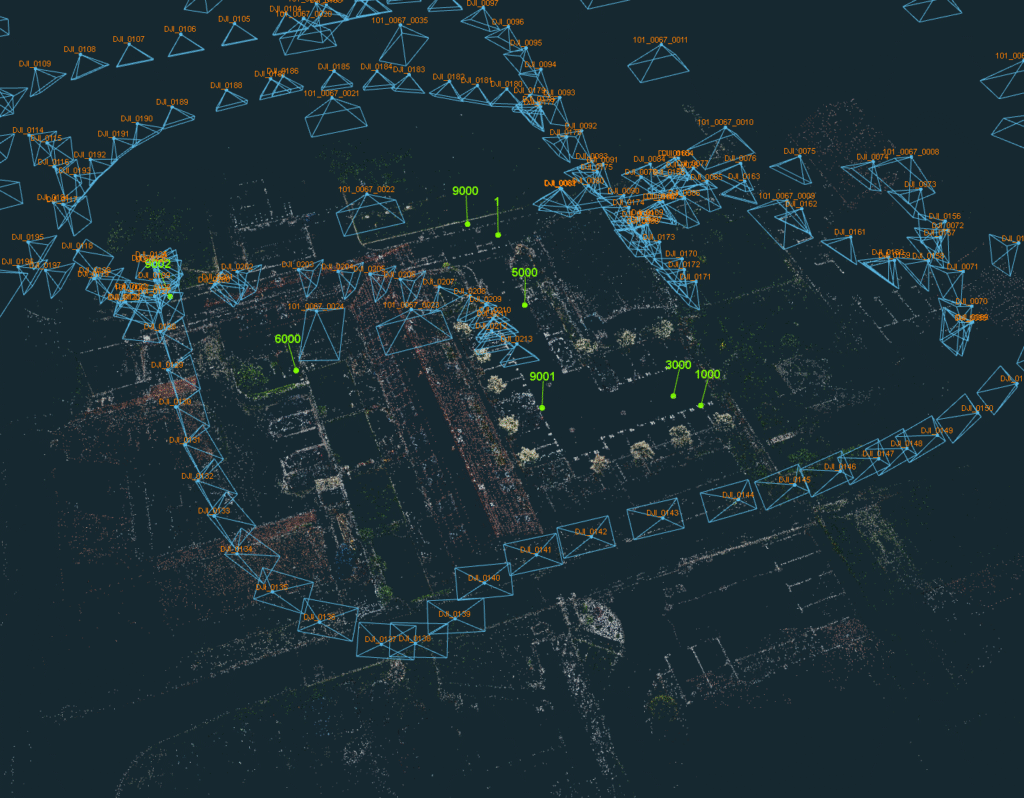
2. Align and generate your point cloud
This is where your raw input becomes 3D. 3Dsurvey aligns the images or scans and builds your point cloud. If it’s wrong here, it stays wrong.
Some mathematical work is needed in the software to match and georeference images. These are the processes that need to be done:
- “Bundle adjustment”: Optimises the parameters of the mathematical model that calculates the point cloud.
- “Orientation”: Georeferencing initial point cloud
- “Dense reconstruction”: Transforming images into a cloud of points
The point cloud reflects everything that came before, so if you have missed focus or a skewed flight, it will show.
Don’t chase alignment perfection with bad data. If your input is flawed, no amount of tweaking in post will fix it or in other words, bad data in, bad data out. Sometimes, a re-flight or re-scan is faster and cleaner.
3. Clean and trim
Now clean the noise: stray trees, edges and bad surfaces, crop your area, merge what matters and delete what doesn’t.
If you’re combining drone and SLAM data—watch for mismatches.
If you use several different data sources like images, GNSS, SLAM , video or LiDAR, you can follow the video or even bathymetry and combine all point clouds into one. Not sure how to do that? Check how to use the merge function or learn how to combine classical terrestrial measurements with photogrammetry. If you really want to go crazy with the data, then this case study is going to help a lot.
Tip: Clean for the use case. A flashy model isn’t helpful for volume reporting. We suggest learning advanced point cloud cleaning and classification for a deeper understanding.
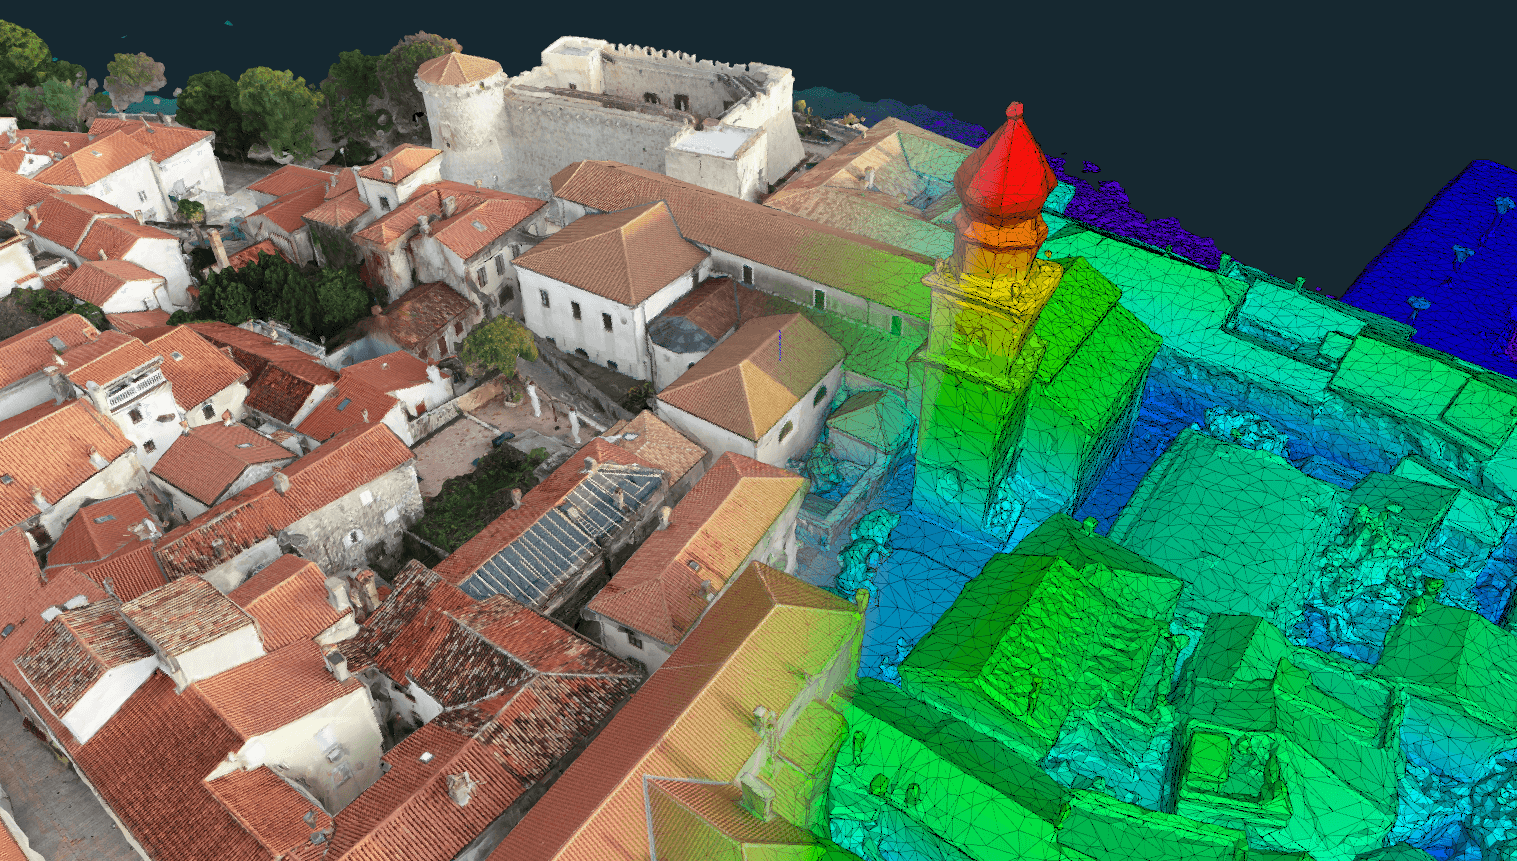
4. Build mesh and apply textures
Time for a mesh! Use your cleaned point cloud to generate a mesh and adjust the detail level of the mesh, depending on what you need.
Want fine detail? Go “high” or “extreme”. Need to export fast? Keep it “low”. Then texture it using your original images.
Textures add realism and are great for façades or reports, but skip this if it slows you down and isn’t needed.
Tip: Don’t overload your system just to make it “look good.”. For best visual results you can turn off the texture compression.


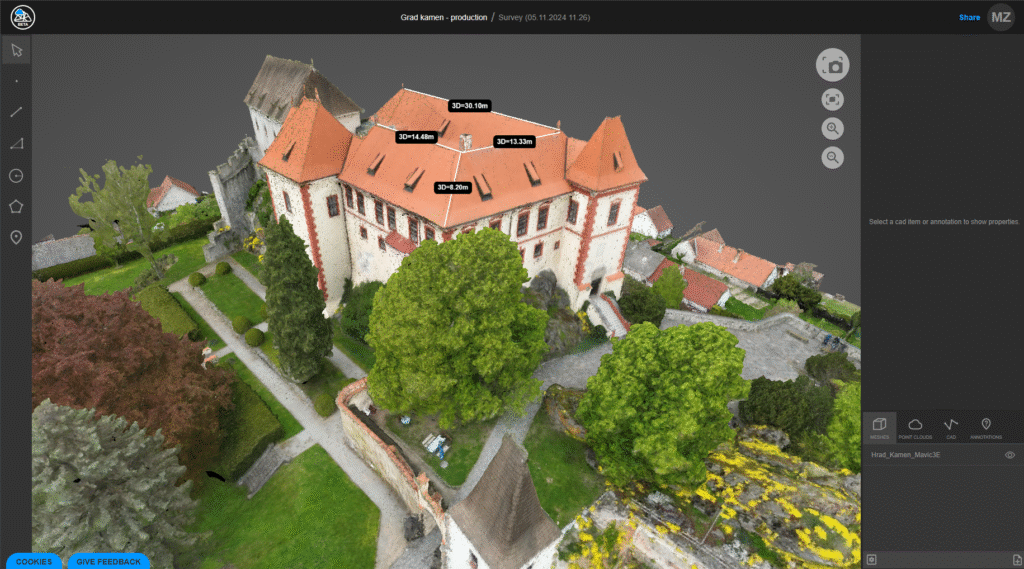
5. Export, measure, deliver
Your model’s done and now it’s time to use it.
Measure distances, calculate volumes, cut cross-sections, draw CAD lines directly in 3Dsurvey. Export whatever format you need: OBJ, PLY, DXF.
And don’t stop at viewing:
- Create true orthophoto
- Share it via 3Dsurvey Cloud Viewer with your best friend or a client
- Feed it into GIS or BIM tools
- Use it for planning, measuring, and analysis
- Send it for 3D printing (yes, people do this)
- Or just look at it, how beautiful it is
Conclusion
We explained how to make a 3D model in 5 steps, but as you have discovered there is more to it. A 3D model is only useful if it’s accurate, fast, and trustworthy. That’s what 3Dsurvey helps you build. Use the data you’ve got and keep the workflow tight. Get results that make sense on-site, not just on screen.
So if you’re serious about how to make a 3D model that works, this is the process. But don’t forget about the pre-step, which is having a tough, precise and safe software like 3Dsurvey. Go try it and see for yourself.

